

Shooting high-volume mini-sessions are super fun, but they can get chaotic very quickly without good systems in place. I'm an organization freak (anyone else? Tell me I'm not alone!!), so when I first started shooting minis it was really important to me that all of my photos were easy to find.
I wanted to create a system that I could easily use in every set of minis going forward. I wanted them organized by mini-session date as well as by individual families. (Believe it or not, every year I have families wanting access to their photos from last year. Those would be impossible to find without a great system in place!)
If you're a visual person, don't worry! I've got photo examples below.
Organizing Using Folders
If you're one of those people who has everything they've ever saved on their desktop, you stress me out!! I LOVE using folders to organize all of my files because they're easy to identify and work through. Each set of mini-sessions (as well as my full sessions) has their own folder. Inside that main folder, I have:
- a Capture folder
- a Selects folder
- an Output folder
For each set of mini-sessions, I have one main Capture folder, one main Selects folder, and one main Output folder like this:
CAPTURE: My Capture folder is where all of my RAW files go as soon as I load them off of my SD card. Yes, I keep all of my RAW photos for up to a year. I've had clients in the past request a specific photo that didn't make the cut, and sometimes I accidentally missed one in their final gallery. Keeping the RAW files is sort of a safety net just in case. (After a year, I delete any RAW files I have in the Capture folders to save space.)
SELECTS: When I cull through my Capture folder using PhotoMechanic and pick the photos I want to edit, those get moved into my Selects folder. (So now the Capture folder has only the RAW files that didn't make the cut.) My Selects folder is what I import into Lightroom. I love having only the RAW photos I'm going to be editing, that way I don't have to sort through the rejects in the editing process.
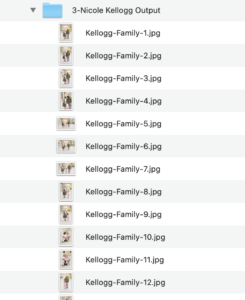
OUTPUT: Once I edit in Lightroom and export my final images as .jpeg files, those go into the Output folder. Those are the files that get delivered to my clients. If their photos ever need to be re-uploaded to their online gallery, I'm able to find them super quickly in my Output folder.
Naming the Folders
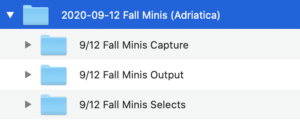
Having a folder system is great, but naming them well will make or break your system. For mini-sessions, my main folder includes the date, the type of minis, and the location like this:
2020-09-12 Fall Minis (Adriatica)
This helps me to see all of my sessions in chronological order, and lets me know what type of session and where it was shot at a glance without having to go look at the photos.
Remember how I have main Capture, Selects, and Output folders? Well inside those folders is where I separate my photos by family. It looks like this:
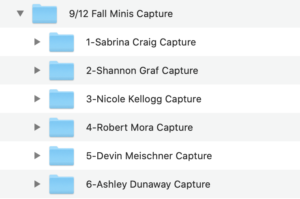
I number the folders to keep them in the order that I shot them (because that's just how my brain works). I'm able to go into my calendar and see what order the families were photographed in. I always use Mom's first and last name to label my folders because she's typically the one who I'm communicating with to book the session.
My Selects and Output folders look just like this, just with “#-Mom's Name Select/Output.”
I keep the RAW files in Capture and Selects as their default name (usually US4A8231 or something like that). When it's time to export the final images, I save my .jpeg images in Output as “LastName-Family-#” so they're nice and pretty when the family downloads them!
Feel free to completely copy my system, tweak it to make it yours, or completely disregard if this totally confused you! The best part about running our own businesses is that we have the freedom to do what works for US! This is what works for me. If you don't have a system in place, give mine a try! The key is to have a system.
____________
For a deep dive into all things mini-sessions, be sure to watch my free 1-hour online class, “Market, Monetize, & Grow Your Photography Business with Mini-Sessions!”

You may also like…
“Prepping Mini-Sessions Clients So They’re Never Late”
not sure where to begin?
here's a great place to start
Get practical business advice (did we mention, *free?*) every week to help you grow a thriving, profitable photography business! From behind-the-scenes editing tips, to posing and marketing - here are some of our most popular posts!


behind the lens
our *behind-the-scenes* membership program
Behind the Lens is our BRAND NEW MEMBERSHIP program geared towards family photographers! Each month our members receive a behind-the-scenes video of me shooting a REAL family session. As a bonus, I also include an EXCLUSIVE MASTERCLASS each month teaching on business topics I don't teach anywhere else! As our MOST AFFORDABLE, value-packed educational resource in our shop, it's a no-brainer for anyone looking to level up their family photography game! Join me every month behind the lens.
be my virtual shadow and learn while you watch me shoot real family sessions!
give me access!

")


