


Manual Mode…just reading it made some of you cringe. You have no idea what any of the settings mean and you feel completely lost if you've ever ventured into Manual Mode…so you always end up switching back to Auto. Don't worry, you aren't alone! Most moms feel this way when it comes to using their DSLR cameras, but I'm here to help! Today I want to break down the foundations that make up Manual Mode to hopefully give you a better understanding of how to get the photos that you want.
The Basics
There are 3 parts that make up the main settings in Manual Mode: Aperture, Shutter Speed, and ISO. These three settings work together and all affect each other when changed. I love Manual Mode because full control is given to the photographer and it takes the guess work off of the camera itself. By setting your aperture, shutter speed, and ISO manually, you are able to tell your camera how blurry to make the background, how quickly to snap the picture, and how much light to let into the lens at any given time. These settings can be adjusted to get great photos no matter what situation you find yourself in! If compromise is necessary to allow more light into a photo, because you are in control you are the one to decide where to compromise.
Aperture
If you're looking for that dreamy, blurry background in your photos, aperture is the way to do it! Your aperture setting (or f-stop) determines how much blur is in the background. A lower f-stop (such as f/2.8) will get a blurrier background, but the focus area (called Depth of Field) in your photo will be much smaller. This means that you may get your subject's eyes tack sharp, but the rest of their body looks softer. A higher f-stop (such as f/5.6) will create a less-blurry background, but your depth of field will be much larger. The more people that are in your shot, the higher you want to set your aperture. If you set your aperture too low, you won't get everyone's faces in focus.
One thing to remember with your aperture is the lower you go, the more light that will be let into your lens (brighter photos). The higher you go, the less light that will be let into your lens (darker photos). If you adjust your aperture, you need to adjust either your shutter speed or ISO to compensate. As I mentioned in the INTRO VIDEO to this lesson, I like to set my aperture and leave it alone so that I have fewer variables to work with. That may work for you, too.
Here's a little cheat sheet for you to understand aperture a little better:
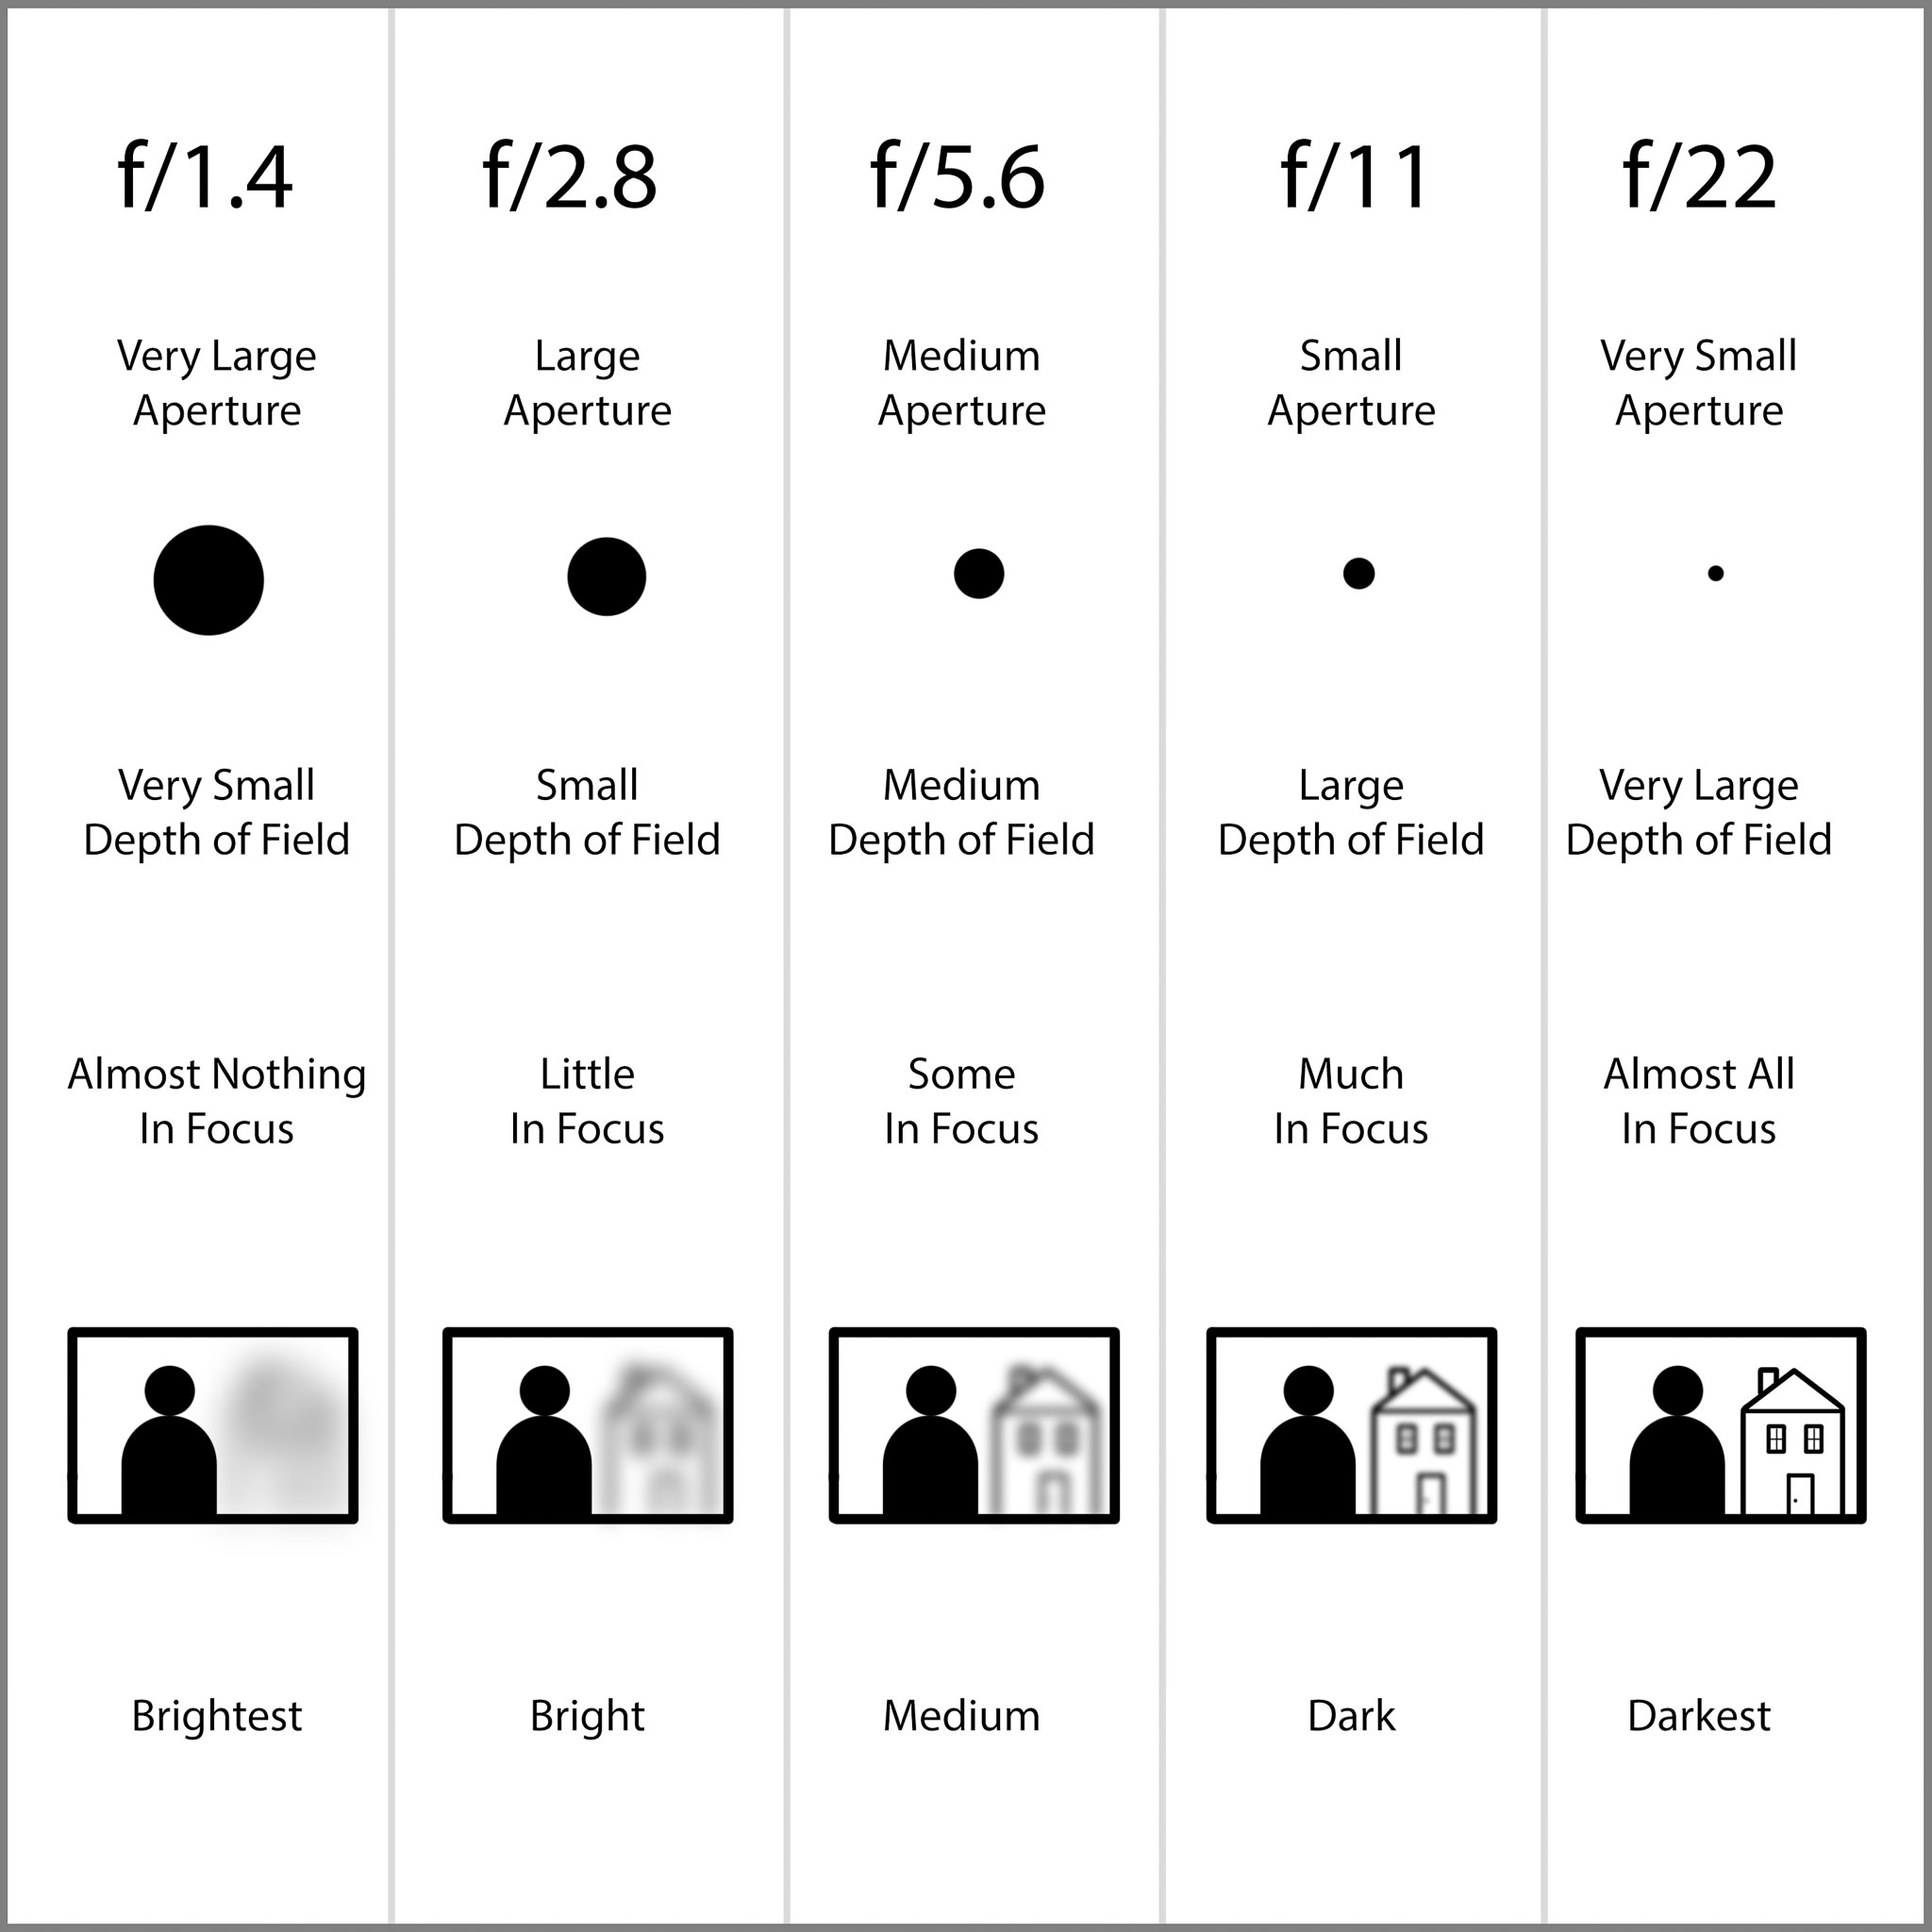
Photo Credit: photographylife.com
Tips for Tack Sharp Focus:
- Use Back Button Focus. (Directions to set this up can be found HERE. Want to know why? I explain this HERE.)
- For that beautiful blurry background, bring your aperture as low as you can without compromising your sharpness. (I prefer not to go any lower than f/2.8.)
- If shooting multiple subjects, try to get their faces all on the same focal plane. Tell them to line up their toes and this should get their bodies on the same plane.
- If you have to put people in rows or on different focal planes, be sure to raise your aperture to get them all in focus.
Shutter Speed
Your shutter speed (the setting that looks like a fraction: 1/100 – fraction of a second) is simply how fast your camera snaps a photo. This is important if you are photographing a moving subject (or a squirmy kiddo). With a slower shutter speed (lower bottom number in the fraction), more light will be allowed into your lens when capturing the photo, resulting in a brighter photo. With a faster shutter speed (larger bottom number in the fraction), less light will be allowed into your lens, resulting in a darker photo. If your shutter speed is too slow, your images will come out blurry. If your shutter speed is too fast, your images will come out very dark.
A good rule of thumb for setting your shutter speed is to double your focal length. If you're shooting with a 50mm lens, double that and make that your bottom number. This means I would shoot NO SLOWER than 1/100. When shooting with my 50mm lens, I personally like to keep it closer to 1/125 or 1/160.
Here are a couple of cheat sheets for setting your shutter speed:
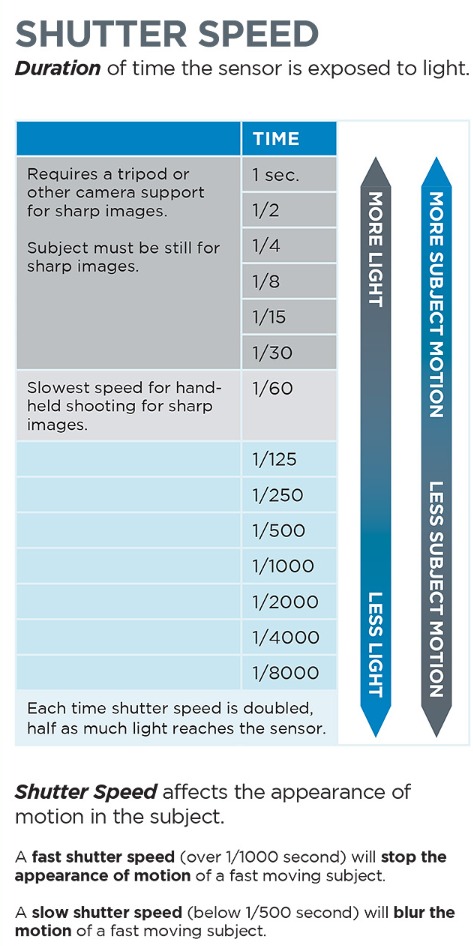
Photo Credit: msladekphoto.com
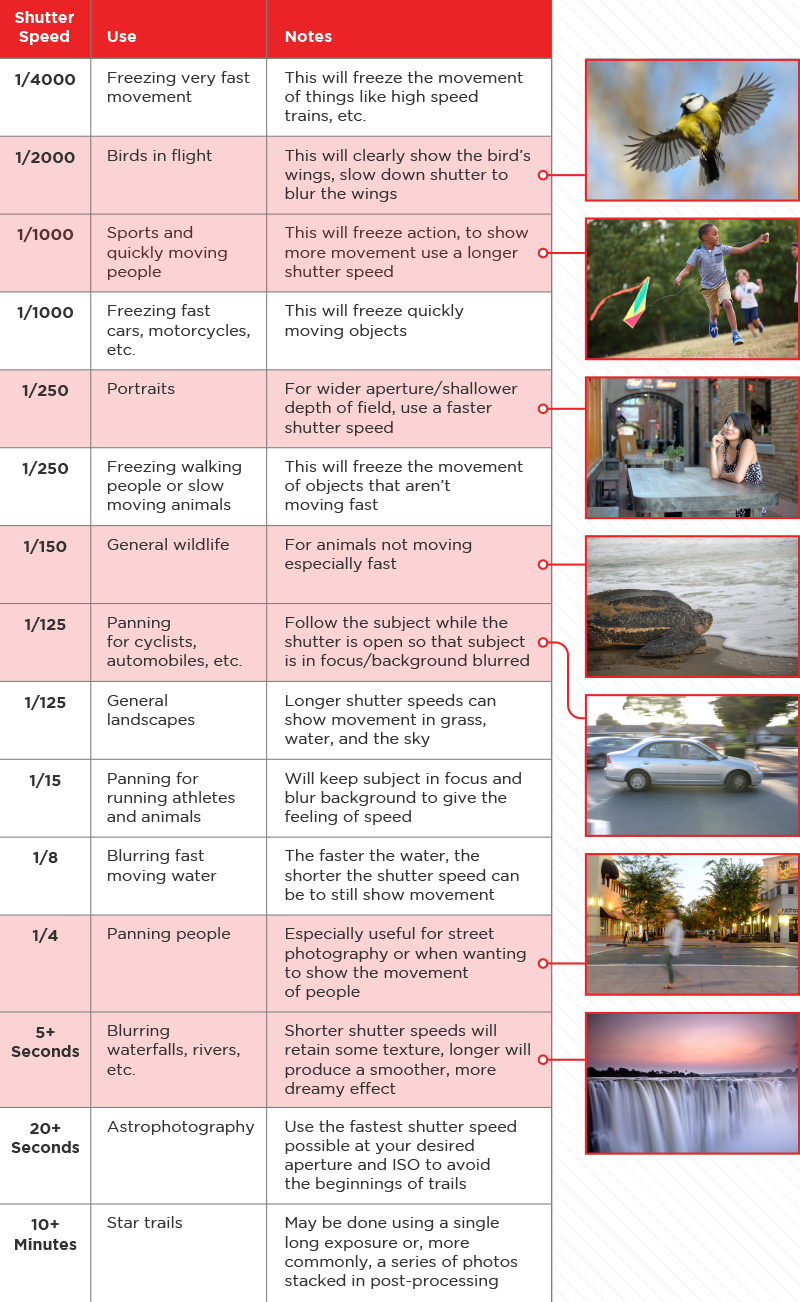
Photo Credit: borrowlenses.com
ISO
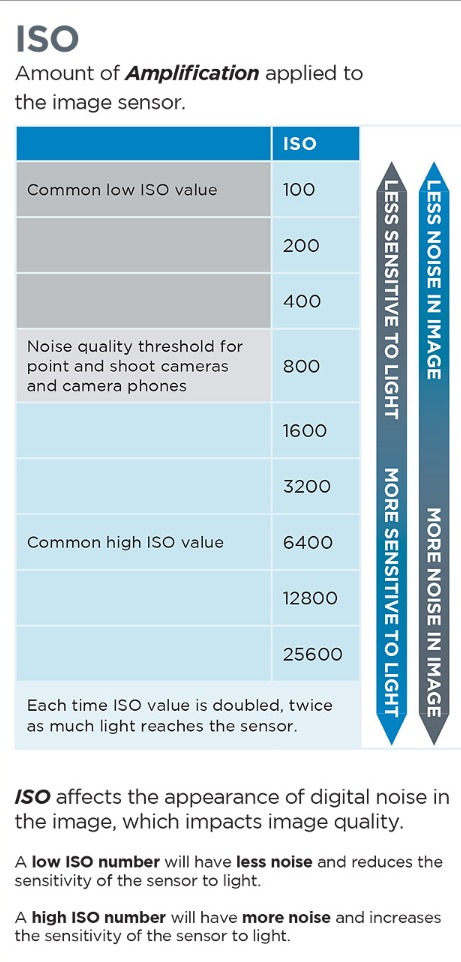
Your ISO simply refers to the overall brightness of your photo. A lower ISO means less light is allowed into your lens, resulting in darker photos. A higher ISO means more light is allowed into your lens, resulting in brighter photos. The downside to a higher ISO is that it introduces grain, or noise into your photos. It is best to keep your ISO as low as you can. If your lighting situation requires you to bring your ISO up higher, just understand that there will be grain in the darker areas of the photo especially.
If you're shooting outside, a good starting place for your ISO would be around 100-200. On a cloudy day you may end up going up to 400 or 600. If you're inside without a flash, you may need to start closer to 1600. The grain will be noticeable at that range, but your photo will come out brighter.
Use this cheat sheet to get a better understanding of the best ISO setting for your lighting situation:
The order that I like to set my settings is this:
- Aperture (then don't touch it again)
- Shutter speed (starting place around 1/160)
- ISO (depending on my lighting situation)
- Shutter Speed again (making it slower if I don't want to raise my ISO anymore but the photo is still too dark)
The more that you play with your settings and see what they do, the greater understanding you'll have about how they work together. I suggest that you pick one and bring it to the extremes. Leave the other two alone and bring the one yo9u pick all the way up, snap your picture, then bring it all the way down and compare what it looks like. Do this with your aperture, shutter speed, and ISO.
When you go to take your actual photos, just remember that when adjusting one thing, it will either make your photo brighter or darker. If it does, ;pick another setting to adjust to compensate.
Now that you know the basics, it's time to get to practicing!
not sure where to begin?
here's a great place to start
Get practical business advice (did we mention, *free?*) every week to help you grow a thriving, profitable photography business! From behind-the-scenes editing tips, to posing and marketing - here are some of our most popular posts!


behind the lens
our *behind-the-scenes* membership program
Behind the Lens is our BRAND NEW MEMBERSHIP program geared towards family photographers! Each month our members receive a behind-the-scenes video of me shooting a REAL family session. As a bonus, I also include an EXCLUSIVE MASTERCLASS each month teaching on business topics I don't teach anywhere else! As our MOST AFFORDABLE, value-packed educational resource in our shop, it's a no-brainer for anyone looking to level up their family photography game! Join me every month behind the lens.
be my virtual shadow and learn while you watch me shoot real family sessions!
give me access!

")


